在面板内的控件之上绘制(C#WinForms)
我知道这个问题已经被问了几次了,但到目前为止我还没有find一个好的解决scheme。
我有一个与其他控制面板。
我想要在面板上的所有控件上画一条线
我遇到了三种types的解决scheme(非他们的工作方式我想要的):
-
获取桌面DC和绘图在屏幕上。
如果它们与表单重叠,这将使用其他应用程序。 -
覆盖面板的“CreateParams”:
=
protected override CreateParams CreateParams { get { CreateParams cp; cp = base.CreateParams; cp.Style &= ~0x04000000; //WS_CLIPSIBLINGS cp.Style &= ~0x02000000; //WS_CLIPCHILDREN return cp; } } //注意我也尝试禁用WS_CLIPSIBLINGS
然后绘制一行OnPaint()。 但是…由于面板的OnPaint在其中的控件的OnPaint之前被调用,因此内部控件的绘制只是简单地绘制在行的顶部。
我见过有人build议使用消息filter来监听WM_PAINT消息,并使用一个计时器,但我不认为这个解决scheme是“好的做法”或者是有效的。
你会怎么做 ? 确定内部控件在X毫秒后完成绘图,并将计时器设置为X毫秒?
该屏幕快照显示closures了WS_CLIPSIBLINGS和WS_CLIPCHILDREN的面板。
蓝线画在小组的OnPaint上,只是被文本框和标签画上。
红线只是涂在顶部,因为它不是从面板的OnPaint(它实际上是一个button被点击的结果) 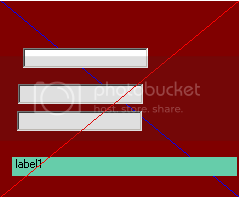
第三:创build一个透明的图层并在该图层上绘制。
我已经创build了一个透明的控制使用:
protected override CreateParams CreateParams { get { CreateParams cp = base.CreateParams; cp.ExStyle |= 0x00000020; //WS_EX_TRANSPARENT return cp; } }
问题仍然在于把透明控制放在面板和所有控制之上。
我试着把它带到前面:“BringToFront()”,但它似乎没有帮助。
我把它放在Line控件的OnPaint()处理程序中。
我应该尝试把它放在别的地方吗?
– 这也造成了面板上的另一个控制问题。 (捕捉鼠标点击等)。
任何帮助将不胜感激!
**编辑:黑线是我正在尝试做的一个样本。 (用窗户油漆来画)
原来这比我想象的要容易得多。 谢谢你不接受我的其他答案。 以下是创buildFline的两个步骤(fating line – 抱歉,已经晚了):
替代文字http://www.freeimagehosting.net/uploads/1fd1206890.jpg
步骤1 :将UserControl添加到您的项目并将其命名为“Fline”。 将以下内容添加到using语句中:
using System.Drawing.Drawing2D;
步骤2 :将以下内容添加到Fline的Resize事件中:
int wfactor = 4; // half the line width, kinda // create 6 points for path Point[] pts = { new Point(0, 0), new Point(wfactor, 0), new Point(Width, Height - wfactor), new Point(Width, Height) , new Point(Width - wfactor, Height), new Point(0, wfactor) }; // magic numbers! byte[] types = { 0, // start point 1, // line 1, // line 1, // line 1, // line 1 }; // line GraphicsPath path = new GraphicsPath(pts, types); this.Region = new Region(path);
编译,然后将Fline拖到窗体或面板上。 重要提示:默认的BackColor和窗体是一样的,所以把Fline的BackColor改成红色或者明显的(在devise器中)。 一个奇怪的怪癖是,当你在devise器中拖动时,它会显示为一个坚实的块,直到你释放它 – 不是一个巨大的交易。
该控件可以出现在任何其他控件的前面或后面。 如果将Enabled设置为false,则它仍然可见,但不会干扰下方控件上的鼠标事件。
当然,您会希望为了您的目的而加强这一点,但这显示了基本原则。 你可以使用相同的技术来创build你喜欢的任何形状的控件(我对这个三angular形的初始testing)。
更新 :这也是一个很好的密集单线程。 只要把它放在你的UserControl的Resize事件中:
this.Region=new Region(new System.Drawing.Drawing2D.GraphicsPath(new Point[]{new Point(0,0),new Point(4,0),new Point(Width,Height-4),new Point(Width,Height),new Point(Width-4,Height),new Point(0,4)},new byte[]{0,1,1,1,1,1}));
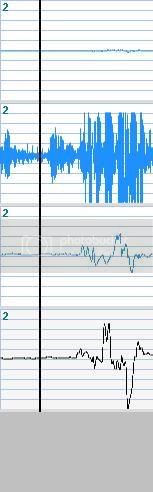
如果你想要的行只是一个简单的水平或垂直线,在主面板上放置另一个面板(禁用,因此它不会拾取任何鼠标事件),将其高度(或宽度)设置为3或4像素(或无论你想要什么),并把它带到前面。 如果您需要在运行时更改行的位置,则可以将面板移动到可见和不可见状态。 以下是它的外观:
替代文字http://www.freeimagehosting.net/uploads/832018002a.jpg
你甚至可以点击你喜欢的任何地方,线条根本不会干涉。 该行根据任何types的控件进行绘制(尽pipeComboBox或DatePicker的下拉部分仍然显示在行的上方)。 蓝线是一样的东西,但发回。
是的,这可以做到。 问题是面板和它上面的控件都是独立的窗口(在API的意义上),因此所有单独的绘图表面。 没有一个绘图表面可以用来获得这个效果(除了顶层的屏幕表面,并且被认为是不礼貌的)。
(咳嗽 – 咳嗽)技巧是在控件下方的面板上绘制线条,并将其绘制在每个控件本身上,从而产生此效果(即使单击button并将鼠标移动):
替代文字http://www.freeimagehosting.net/uploads/2dce0ba7ab.gif
创build一个winforms项目(这应该默认与Form1一起)。 如图所示在面板上添加一个面板(名为“panel1”)和两个button(“button1”和“button2”)。 将下面的代码添加到窗体的构造函数中:
panel1.Paint += PaintPanelOrButton; button1.Paint += PaintPanelOrButton; button2.Paint += PaintPanelOrButton;
然后将此方法添加到窗体的代码中:
private void PaintPanelOrButton(object sender, PaintEventArgs e) { // center the line endpoints on each button Point pt1 = new Point(button1.Left + (button1.Width / 2), button1.Top + (button1.Height / 2)); Point pt2 = new Point(button2.Left + (button2.Width / 2), button2.Top + (button2.Height / 2)); if (sender is Button) { // offset line so it's drawn over the button where // the line on the panel is drawn Button btn = (Button)sender; pt1.X -= btn.Left; pt1.Y -= btn.Top; pt2.X -= btn.Left; pt2.Y -= btn.Top; } e.Graphics.DrawLine(new Pen(Color.Red, 4.0F), pt1, pt2); }
像这样的东西需要在每个控件的Paint事件中绘制,以便该行保留。 在.NET中直接绘制控件是很容易的,但是当有人点击button或者将鼠标移动到其上时(除非它在Paint事件中永久重画,如下所示)。
请注意,为了这个工作,任何绘制的控件必须有一个Paint事件。 我相信你将不得不修改这个示例来实现你所需要的。 如果你想出了一个很好的泛化function,请张贴它。
更新:这种方法不适用于滚动条,文本框,combobox,列表视图,或基本上任何与文本框types的东西作为它的一部分(而不是因为它只是偏移上面的例子中的button – 你只是不能画一个文本框的顶部,至less不是从它的Paint事件,至less不是如果你是我)。 希望这不会是一个问题。
窗体窗体面板是控件的容器。 如果你想在面板的其他控件上绘制一些东西,那么你需要的是另一个控件(在z顺序的顶部)。
幸运的是,您可以创build具有非矩形边框的窗体控件。 看看这个技巧: http : //msdn.microsoft.com/en-us/library/aa289517(VS.71).aspx
只需在屏幕上绘制一些东西,使用标签控件,然后closuresAutoSize。 然后附加到Paint事件并设置大小和区域属性。
这是一个代码示例:
private void label1_Paint(object sender, PaintEventArgs e) { System.Drawing.Drawing2D.GraphicsPath myGraphicsPath = new System.Drawing.Drawing2D.GraphicsPath(); myGraphicsPath.AddEllipse(new Rectangle(0, 0, 125, 125)); myGraphicsPath.AddEllipse(new Rectangle(75, 75, 20, 20)); myGraphicsPath.AddEllipse(new Rectangle(120, 0, 125, 125)); myGraphicsPath.AddEllipse(new Rectangle(145, 75, 20, 20)); //Change the button's background color so that it is easy //to see. label1.BackColor = Color.ForestGreen; label1.Size = new System.Drawing.Size(256, 256); label1.Region = new Region(myGraphicsPath); }
我能想到的唯一简单的解决scheme是为每个要绘制的控件创buildPaint事件处理程序。 然后协调这些处理程序之间的线条绘图。 这不是最方便的解决scheme,但是这将使您能够在控件上进行绘制。
假设button是面板的子控件:
panel.Paint += new PaintEventHandler(panel_Paint); button.Paint += new PaintEventHandler(button_Paint); protected void panel_Paint(object sender, PaintEventArgs e) { //draw the full line which will then be partially obscured by child controls } protected void button_Paint(object sender, PaintEventArgs e) { //draw the obscured line portions on the button }
做一个新的LineControl:像这样的控制:
然后在InitializeComponent之后调用BringToFront()
public partial class MainForm : Form { public MainForm() { InitializeComponent(); this.simpleLine1.BringToFront(); } } using System; using System.Windows.Forms; using System.Drawing; using System.Collections.Generic; public class SimpleLine : Control { private Control parentHooked; private List<Control> controlsHooked; public enum LineType { Horizontal, Vertical, ForwardsDiagonal, BackwardsDiagonal } public event EventHandler AppearanceChanged; private LineType appearance; public virtual LineType Appearance { get { return appearance; } set { if (appearance != value) { this.SuspendLayout(); switch (appearance) { case LineType.Horizontal: if (value == LineType.Vertical) { this.Height = this.Width; } break; case LineType.Vertical: if (value == LineType.Horizontal) { this.Width = this.Height; } break; } this.ResumeLayout(false); appearance = value; this.PerformLayout(); this.Invalidate(); } } } protected virtual void OnAppearanceChanged(EventArgs e) { if (AppearanceChanged != null) AppearanceChanged(this, e); } public event EventHandler LineColorChanged; private Color lineColor; public virtual Color LineColor { get { return lineColor; } set { if (lineColor != value) { lineColor = value; this.Invalidate(); } } } protected virtual void OnLineColorChanged(EventArgs e) { if (LineColorChanged != null) LineColorChanged(this, e); } public event EventHandler LineWidthChanged; private float lineWidth; public virtual float LineWidth { get { return lineWidth; } set { if (lineWidth != value) { if (0 >= value) { lineWidth = 1; } lineWidth = value; this.PerformLayout(); } } } protected virtual void OnLineWidthChanged(EventArgs e) { if (LineWidthChanged != null) LineWidthChanged(this, e); } public SimpleLine() { base.SetStyle(ControlStyles.AllPaintingInWmPaint | ControlStyles.Selectable, false); base.SetStyle(ControlStyles.SupportsTransparentBackColor, true); base.BackColor = Color.Transparent; InitializeComponent(); appearance = LineType.Vertical; LineColor = Color.Black; LineWidth = 1; controlsHooked = new List<Control>(); this.ParentChanged += new EventHandler(OnSimpleLineParentChanged); } private void RemoveControl(Control control) { if (controlsHooked.Contains(control)) { control.Paint -= new PaintEventHandler(OnControlPaint); if (control is TextboxX) { TextboxX text = (TextboxX)control; text.DoingAPaint -= new EventHandler(text_DoingAPaint); } controlsHooked.Remove(control); } } void text_DoingAPaint(object sender, EventArgs e) { this.Invalidate(); } private void AddControl(Control control) { if (!controlsHooked.Contains(control)) { control.Paint += new PaintEventHandler(OnControlPaint); if (control is TextboxX) { TextboxX text = (TextboxX)control; text.DoingAPaint += new EventHandler(text_DoingAPaint); } controlsHooked.Add(control); } } private void OnSimpleLineParentChanged(object sender, EventArgs e) { UnhookParent(); if (Parent != null) { foreach (Control c in Parent.Controls) { AddControl(c); } Parent.ControlAdded += new ControlEventHandler(OnParentControlAdded); Parent.ControlRemoved += new ControlEventHandler(OnParentControlRemoved); parentHooked = this.Parent; } } private void UnhookParent() { if (parentHooked != null) { foreach (Control c in parentHooked.Controls) { RemoveControl(c); } parentHooked.ControlAdded -= new ControlEventHandler(OnParentControlAdded); parentHooked.ControlRemoved -= new ControlEventHandler(OnParentControlRemoved); parentHooked = null; } } private void OnParentControlRemoved(object sender, ControlEventArgs e) { RemoveControl(e.Control); } private void OnControlPaint(object sender, PaintEventArgs e) { int indexa =Parent.Controls.IndexOf(this) , indexb = Parent.Controls.IndexOf((Control)sender); //if above invalidate on paint if(indexa < indexb) { Invalidate(); } } private void OnParentControlAdded(object sender, ControlEventArgs e) { AddControl(e.Control); } private System.ComponentModel.IContainer components = null; private void InitializeComponent() { components = new System.ComponentModel.Container(); } protected override void Dispose(bool disposing) { if (disposing && (components != null)) { components.Dispose(); } base.Dispose(disposing); } protected override CreateParams CreateParams { get { CreateParams cp = base.CreateParams; cp.ExStyle |= 0x20; // Turn on WS_EX_TRANSPARENT return cp; } } protected override void OnLayout(LayoutEventArgs levent) { switch (this.Appearance) { case LineType.Horizontal: this.Height = (int)LineWidth; this.Invalidate(); break; case LineType.Vertical: this.Width = (int)LineWidth; this.Invalidate(); break; } base.OnLayout(levent); } protected override void OnPaintBackground(PaintEventArgs pevent) { //disable background paint } protected override void OnPaint(PaintEventArgs pe) { switch (Appearance) { case LineType.Horizontal: DrawHorizontalLine(pe); break; case LineType.Vertical: DrawVerticalLine(pe); break; case LineType.ForwardsDiagonal: DrawFDiagonalLine(pe); break; case LineType.BackwardsDiagonal: DrawBDiagonalLine(pe); break; } } private void DrawFDiagonalLine(PaintEventArgs pe) { using (Pen p = new Pen(this.LineColor, this.LineWidth)) { pe.Graphics.DrawLine(p, this.ClientRectangle.X, this.ClientRectangle.Bottom, this.ClientRectangle.Right, this.ClientRectangle.Y); } } private void DrawBDiagonalLine(PaintEventArgs pe) { using (Pen p = new Pen(this.LineColor, this.LineWidth)) { pe.Graphics.DrawLine(p, this.ClientRectangle.X, this.ClientRectangle.Y, this.ClientRectangle.Right, this.ClientRectangle.Bottom); } } private void DrawHorizontalLine(PaintEventArgs pe) { int y = this.ClientRectangle.Height / 2; using (Pen p = new Pen(this.LineColor, this.LineWidth)) { pe.Graphics.DrawLine(p, this.ClientRectangle.X, y, this.ClientRectangle.Width, y); } } private void DrawVerticalLine(PaintEventArgs pe) { int x = this.ClientRectangle.Width / 2; using (Pen p = new Pen(this.LineColor, this.LineWidth)) { pe.Graphics.DrawLine(p,x, this.ClientRectangle.Y, x, this.ClientRectangle.Height); } } }
编辑:添加对angular线支持
我已经添加了一些支持重新获得焦点时重绘的控件。
文本框和combobox将无法正常工作,因为您将需要使自己的和挂钩那里的油漆命令如下所示:
public class TextboxX : TextBox { public event EventHandler DoingAPaint; protected override void WndProc(ref Message m) { switch ((int)m.Msg) { case (int)NativeMethods.WindowMessages.WM_PAINT: case (int)NativeMethods.WindowMessages.WM_ERASEBKGND: case (int)NativeMethods.WindowMessages.WM_NCPAINT: case 8465: //not sure what this is WM_COMMAND? if(DoingAPaint!=null)DoingAPaint(this,EventArgs.Empty); break; } base.WndProc(ref m); } }
它没有testing,我相信你可以改善它
编辑find一种方法来摆脱我有的recursion绘画问题。 所以,现在,对我来说,这看起来非常非常非常接近你想要达到的目标。
这是我能想出来的。 它使用原始问题中概述的方法3。 代码有点冗长,因为涉及三个类:
- 一个名为DecorationCanvas的私人类。 这源自面板,并使用WS_EX_TRANSPARENT提供一个透明canvas来绘制我们的东西
- 面板类本身,我称之为DecoratedPanel,它来自Panel
- 为面板devise一个名为DecoratedPanelDesigner的devise器类,以确保ZOrder可以在devise时保留下来。
基本的方法是:
- 在DecoratedPanel的构造函数中,创build一个DecorationCanvas的实例并将其添加到DecoratedPanel控件集合中。
- 重写OnControlAdded和OnControlRemoved,自动挂钩/取消挂钩子控件的绘画事件,并确保DecorationCanvas位于ZOrder之上。
- 每当一个包含的控件绘制,使对应的DecorationCanvas矩形失效。
- 重写OnResize和OnSizeChanged以确保DecorationCanvas具有与DecoratedPanel相同的大小。 (我尝试使用Anchor属性来完成此操作,但以某种方式失败)。
- 提供一个内部方法来重置DecoratedPanelDesigner中的DecorationCanvas ZOrder。
在我的系统(VS2010 / .net4 / Windows XP SP3)上正常工作。 代码如下:
using System; using System.ComponentModel; using System.ComponentModel.Design; using System.Drawing; using System.Windows.Forms; using System.Windows.Forms.Design; namespace WindowsFormsApplication3 { [Designer("WindowsFormsApplication3.DecoratedPanelDesigner")] public class DecoratedPanel : Panel { #region decorationcanvas // this is an internal transparent panel. // This is our canvas we'll draw the lines on ... private class DecorationCanvas : Panel { public DecorationCanvas() { // don't paint the background SetStyle(ControlStyles.Opaque, true); } protected override CreateParams CreateParams { get { // use transparency CreateParams cp = base.CreateParams; cp.ExStyle |= 0x00000020; //WS_EX_TRANSPARENT return cp; } } } #endregion private DecorationCanvas _decorationCanvas; public DecoratedPanel() { // add our DecorationCanvas to our panel control _decorationCanvas = new DecorationCanvas(); _decorationCanvas.Name = "myInternalOverlayPanel"; _decorationCanvas.Size = ClientSize; _decorationCanvas.Location = new Point(0, 0); // this prevents the DecorationCanvas to catch clicks and the like _decorationCanvas.Enabled = false; _decorationCanvas.Paint += new PaintEventHandler(decoration_Paint); Controls.Add(_decorationCanvas); } protected override void Dispose(bool disposing) { if (disposing && _decorationCanvas != null) { // be a good citizen and clean up after yourself _decorationCanvas.Paint -= new PaintEventHandler(decoration_Paint); Controls.Remove(_decorationCanvas); _decorationCanvas = null; } base.Dispose(disposing); } void decoration_Paint(object sender, PaintEventArgs e) { // --- PAINT HERE --- e.Graphics.DrawLine(Pens.Red, 0, 0, ClientSize.Width, ClientSize.Height); } protected override void OnControlAdded(ControlEventArgs e) { base.OnControlAdded(e); if (IsInDesignMode) return; // Hook paint event and make sure we stay on top if (!_decorationCanvas.Equals(e.Control)) e.Control.Paint += new PaintEventHandler(containedControl_Paint); ResetDecorationZOrder(); } protected override void OnControlRemoved(ControlEventArgs e) { base.OnControlRemoved(e); if (IsInDesignMode) return; // Unhook paint event if (!_decorationCanvas.Equals(e.Control)) e.Control.Paint -= new PaintEventHandler(containedControl_Paint); } /// <summary> /// If contained controls are updated, invalidate the corresponding DecorationCanvas area /// </summary> /// <param name="sender"></param> /// <param name="e"></param> void containedControl_Paint(object sender, PaintEventArgs e) { Control c = sender as Control; if (c == null) return; _decorationCanvas.Invalidate(new Rectangle(c.Left, c.Top, c.Width, c.Height)); } protected override void OnResize(EventArgs eventargs) { base.OnResize(eventargs); // make sure we're covering the panel control _decorationCanvas.Size = ClientSize; } protected override void OnSizeChanged(EventArgs e) { base.OnSizeChanged(e); // make sure we're covering the panel control _decorationCanvas.Size = ClientSize; } /// <summary> /// This is marked internal because it gets called from the designer /// to make sure our DecorationCanvas stays on top of the ZOrder. /// </summary> internal void ResetDecorationZOrder() { if (Controls.GetChildIndex(_decorationCanvas) != 0) Controls.SetChildIndex(_decorationCanvas, 0); } private bool IsInDesignMode { get { return DesignMode || LicenseManager.UsageMode == LicenseUsageMode.Designtime; } } } /// <summary> /// Unfortunately, the default designer of the standard panel is not a public class /// So we'll have to build a new designer out of another one. Since Panel inherits from /// ScrollableControl, let's try a ScrollableControlDesigner ... /// </summary> public class DecoratedPanelDesigner : ScrollableControlDesigner { private IComponentChangeService _changeService; public override void Initialize(IComponent component) { base.Initialize(component); // Acquire a reference to IComponentChangeService. this._changeService = GetService(typeof(IComponentChangeService)) as IComponentChangeService; // Hook the IComponentChangeService event if (this._changeService != null) this._changeService.ComponentChanged += new ComponentChangedEventHandler(_changeService_ComponentChanged); } /// <summary> /// Try and handle ZOrder changes at design time /// </summary> /// <param name="sender"></param> /// <param name="e"></param> void _changeService_ComponentChanged(object sender, ComponentChangedEventArgs e) { Control changedControl = e.Component as Control; if (changedControl == null) return; DecoratedPanel panelPaint = Control as DecoratedPanel; if (panelPaint == null) return; // if the ZOrder of controls contained within our panel changes, the // changed control is our control if (Control.Equals(panelPaint)) panelPaint.ResetDecorationZOrder(); } protected override void Dispose(bool disposing) { if (disposing) { if (this._changeService != null) { // Unhook the event handler this._changeService.ComponentChanged -= new ComponentChangedEventHandler(_changeService_ComponentChanged); this._changeService = null; } } base.Dispose(disposing); } /// <summary> /// If the panel has BorderStyle.None, a dashed border needs to be drawn around it /// </summary> /// <param name="pe"></param> protected override void OnPaintAdornments(PaintEventArgs pe) { base.OnPaintAdornments(pe); Panel panel = Control as Panel; if (panel == null) return; if (panel.BorderStyle == BorderStyle.None) { using (Pen p = new Pen(SystemColors.ControlDark)) { p.DashStyle = System.Drawing.Drawing2D.DashStyle.Dash; pe.Graphics.DrawRectangle(p, 0, 0, Control.Width - 1, Control.Height - 1); } } } } }
让我知道你的想法 …
我认为最好的办法就是inheritance你想要绘制的控件。 重写OnPaint方法,从内部调用base.Paint(),然后使用相同的graphics实例绘制线条。 同时,你也可以有一个参数,该参数在哪一点上应该被绘制,以便你可以直接从你的主窗体中控制线条。
原始代码应该是:
protected override CreateParams CreateParams { get { CreateParams cp; cp = base.CreateParams; cp.Style &= 0x7DFFFFFF; //WS_CLIPCHILDREN return cp; } }
这工作!
如何解决scheme#1(获取桌面DC和绘图在屏幕上):
- 获取桌面DC和该DC的graphics对象[Graphics.fromHDC(…)]
- 将生成的Graphics对象的Clip属性设置为窗体的当前可见区域。 (我还没有研究如何find表单的可见区域)
- 做你的graphics渲染。
